

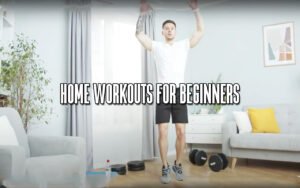
Life gets hectic, and we frequently miss our favorite health and fitness center when we’re traveling or otherwise unable to go there for a workout. These top 25 home workouts from Home Workout Reviews will help you stay on track no matter where you are. These simple exercises, which you may do with only your body weight, can help you create a comprehensive at-home workout that meets your requirements and capabilities.
Top 25 Home Workouts
1. Supermans
Who doesn’t want to believe they have superhuman abilities? It provides a really wide stretch when you try to touch the walls across from you with your fingertips and toes.
Step 1
Starting Position: Lie faceup (on your stomach) on a mat with your legs outstretched, ankles plantarflexed, and arms extended above your head with palms facing each other. Allow your head to relax and align with your spine.
Step 2
Upward Phase:
- Exhale and tighten your abdominal and core muscles to keep your spine rigid while slowly extending both hips (lift both legs) a few inches off the floor.
- Raise both arms a few inches above the floor at the same time.
- While doing so, keep the legs and arms outstretched with no rotation in either.
- Maintain a level head and torso posture, avoiding arching in your back or elevation of the top portion of your skull.
- Hold it for a few seconds.
Step 3
Downward Phase: Exhale fully and gently lower your legs and arms back to their starting position, keeping your low back and hips motionless.
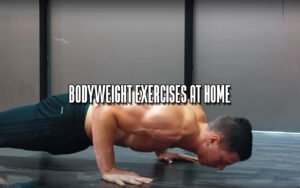
2. Push-up
The Push-up is a classic that’s been around for a long time. You may modify the intensity of your workouts by moving your hands.
Step 1
Starting Position: Bring your legs together behind you while sitting on an exercise mat or floor.
Step 2
Bend over and rest your palms flat on the mat, spacing them shoulder-width apart with your fingers pointing forward or slightly inward. Continue to shift your body weight forward as you reach back with your hands. Reposition your hands as needed to ensure that your entire body extends without bending at the hips or knees. Contract your core/abdominal muscles (known as “bracing”), your glute and quadriceps muscles, and position your head with your spine. Place your feet together and dorsiflex your ankles (turn your toes toward your shins).
Step 3
Downward Phase:
- Maintain your spine straight and aligned with your head as you lower yourself to the floor.
- Do not allow your back to hang on or your hips to rise upwards during this downward phase.
- Continue to lower yourself until your chin or chest contact the floor/mat.
- During the lowering phase, allow your elbows to flare outwards.
Step 4
Upward Phase:
- Keep your head and torso straight and aligned with your spine as you push up through your arms.
- Consider pushing the floor away from you for added strength.
- Keep your back straight and your hips level.
- Continue to hold the grip for a few moments before fully extending the arms at the elbows.
Step 5
Another option is to put your hands forward and keep your elbows near your sides during the lowering portion. That focuses the attention away from the chest muscles and onto the triceps, which may help to decrease stresses in the shoulder joint.
The heel of your palm and the outside surface provide more force and stability to your shoulders when you press through them.
3. Contralateral Limb Raises
Don’t be intimidated by the term – it’s perfect for reducing those pesky upper body regions.
Step 1
Starting Position: Lie down on a mat on your stomach with your legs stretched out, ankles plantarflexed (toes pointed away from your shins), and hands extended above your head. Relax your head and neck to help them line up with your spine.
Step 2
Upward Phase: Exhale, constrict your abdominal/core muscles to keep your spine stable, and raise one arm a few inches off the floor without rotating your arm. Maintain your head and torso position by avoiding arching in your back or raising your head. Hold this pose for a few seconds.
Step 3
Downward Phase: Inhale and slowly lower your arm back to the start position without moving your low back or hips.
Step 4
Exercise Variation (1):
Tightening your abdominal and core muscles to keep your spine stable from your starting position while slowly extending one hip (raise one leg) a few inches off the floor.
Keep your leg extended, ankle plantarflexed (toes pointing away from your shins), and avoid any rotation in your leg.
Maintain your head and torso position, keeping your spine straight and avoiding arching in your back or raising your head.
Hold it for a few moments before returning to your starting position.
Step 5
Exercise Variation(2): Contract your core and abdominal muscles to stabilize your spine, then slowly extend one hip (raise one leg) several inches off the floor while simultaneously raising the opposite arm a few inches off the floor from your starting position. Keeping your legs and arms outstretched is essential here. Avoid any rotation in each limb. Maintain your head and torso position by keeping your back straight and avoiding arching or raising your head. Hold it for a few moments before returning to your starting position.
4. Bent Knee Push-up
If you’re having trouble with the proper form with a full push-up, this is a great place to start.
Step 1
Starting Position: Bring your feet together behind you and kneel on an exercise mat or floor.
Step 2
Bend forward with your palm hands flat on the mat, placing them shoulder-width apart with fingers pointing forward. Shift your weight slightly ahead until your shoulders are directly over your hands. Reposition your hands as needed to enable the complete extension of your body from the knees with no hip bend. Stiffen your body by tightening your core and abdominal muscles (or “bracing”).
Step 3
Downward Phase:
- Raise your hips until they are at the same level as your shoulders.
- Maintain a solid spine with your torso and head aligned with your spine as you lower yourself to the floor.
- Do not let your low back sag or your hips rise upwards during the downward phase.
- Continue lowering yourself until your chin or chest contacts the mat or floor.
- Keep your elbows close to your body, or flare them out slightly.
Step 4
Upward Phase:
Raise your arms straight up with palms facing each other and elbows locked, keeping a rigid torso and head in line with your spine.
Make sure your back isn’t drooping, or your hips are not hitching up.
Continue bending the arms until the elbows are fully extended.
Push-ups put a lot of stress on the wrist joints. You may try using dumbbells and grip the handles instead of placing your hands on the floor to reduce some of this stress. When performing dips from a higher position, such as with dumbbells, you don’t need to bring your chest or chin to the floor; instead, descend until your chest or chin are in level with the dumbbell handles.
5. Downward-facing Dog
It’s essential to move slowly and carefully. – Fantastic calf stretch is required.
Step 1
Knees should be directly beneath the hips, and your palms should be slightly in front of your shoulders. Turn your toes under and root down through all four corners of your hands.
Step 2
Exhale and raise your legs from the floor, keeping your knees slightly bent and your heels off the floor at first. Draw your inner legs from the inside of your ankles up through your groins. Keep away your tailbone from the back of your pelvis and straighten it.
Step 3
Exhale and push your top thighs back as far as you can, stretching your heels toward the floor. Straighten both of your legs without locking them.
Step 4
Firm your outer arms and push the bases of your index fingers into the floor with great force; extend your palms and elbows and place them on the tops of your shoulders. You were lifting the inside arms from wrists to the top of shoulders. Strong your shoulder blades against your back, and then spread them wide and pull them toward your tailbone. Keep your head positioned between the top of your upper arms.
Step 5
Stay in the posture for 10 or more breaths, then bend your knees and lower yourself into Child’s Pose on an exhalation.
6. Bent-Knee Sit-up / Crunches
Most people don’t know how to perform a proper sit-up/crunch until now. Core Power!
Step 1
Starting Position: Lie on a mat with your legs bent, feet flat on the floor, and heels 12 – 18″ from your tailbone in a prone (on your back) posture.
Step 2
Put your hands behind your head, bringing your elbows back and squeezing your scapulae (shoulder blades) together while keeping your low back neutral. Throughout the exercise, keep your elbows in this position. When you breathe in, your head should be aligned with your spinal column and can bend somewhat (moving the chin towards the chest) during the upward portion of this exercise.
Step 3
Upward Phase: Exhale and try to get your abs and core muscles as tight as possible, pulling your chin towards your chest. Slowly turn your upper body toward your thighs. This physical exercise aims to bring your rib cage closer to your pelvis (the neck remains relaxed while the chin is tucked in). At all times, your feet, tailbone, and lower back should be in touch with the mat. Raise your upper back off the mat by curling up until it’s perpendicular to the floor. Hold it for a few seconds.
Step 4
Downward Phase: Inhale and slowly uncurl (lower) your body back toward the mat in a smooth, controlled manner while keeping your feet, tailbone, and lower back in touch with the mat.
This exercise is best done in the position shown above. This posture prevents excessive stress on your low back if performed correctly. Individuals often move this exercise too quickly, causing the hip flexors to assist with the upswing. This method should be avoided because it puts more strain on the lower back. The abdominals join the rib cage to the pelvis, so focus your exercises on bringing these two body parts are closer together while keeping the shoulders and neck relaxed.
7. Push-up with Single-leg Raise
This is a great transition from a traditional Push-Up; however, keep good form in mind.
Step 1
Starting Position: Kneel on an exercise mat with your feet together behind you.
Step 2
Bend your body forward and place your hands flat on the mat, keeping them shoulder-width apart and with your fingers pointed forward. Slowly bend your knees, moving your weight forward until your shoulders are over your hands. Maintain a solid grip on the handles and push up to return to standing. Fully extend your body without any bend at the hips or knees. Stiffen your body by bracing your core and abdominal muscles. Align your head with your spine and stiffen your torso by contracting your core and abdominal muscles. With your feet together and your ankles dorsiflexed, reach down and touch the floor with both hands.
Step 3
Downward Phase: Lower your body slowly to the floor while keeping a solid torso and headline with your spine. While lowering your body, keep your spine straight and avoid allowing your back to slump or hips to rise. Contract your glutes (butt) and quadriceps (thigh) muscles to provide core stability. Continue lowering yourself until your chin or chest touches the mat or floor. Your elbows should be kept close to the sides of your body or permitted to flare out a little.
Step 4
Upward Phase:
- Push your upper body while keeping your torso and head aligned with your spine.
- Raise your left foot in front of you as you push up, extending your left hip to elevate your left foot off the floor.
- Avoid rotation in your hip as you lift the left leg off the floor.
- Do not allow your back to collapse or your hips to rise up.
- Continue to press until your left leg is off the floor and your arms are completely extended at the elbows.
- Before returning to your original position, hold this posture for a few moments.
- Repeat with your opposite leg.
- The inside of your hand should be pushed toward the center while pushing through the heel, and the outside surface provides additional force to your press and shoulder stability.
8. Front Plank
This is more difficult than it appears! Your back and abs will be grateful to you.
Step 1
Starting Position:
Place your palm hands in front of your chest with the backs of your palms facing down and elbows close to your sides. You may use an exercise mat or a carpeted floor if you prefer.
Extend your legs and dorsiflex your ankles by contracting your quadriceps (extend arms out to sides).
To rigid your torso, tighten your core and abdominal muscles.
Step 2
Upward Phase:
- Raise your entire body off the floor or mat, keeping a rigid torso and legs.
- Avoid arching in your low back, hunching (upwards) in your hips, or bending your knees.
- Make sure that your shoulders are positioned above your elbows with your palms facing down, and avoid shrugging them.
- Continue to breathe while maintaining this posture for the time indicated (5+ seconds).
Step 3
Downward Phase: Lower your body carefully towards the mat or floor after extending it, keeping it stiff and straight.
If you feel any type of discomfort in your lower back during this activity, immediately stop and see a health professional.
9. Side Plank with Bent Knee
A fantastic method to add in hip work without the need for extra equipment than simply your own body weight.
Step 1
Starting Position:
- Lie prone on your right side on an exercise mat with your left leg laying directly over your right.
- Bend your knees to a comfortable posture.
- Raise your upper body to support your right arm, bending your right elbow to 90 degrees and placing it directly beneath your shoulder.
- Keep your lower knee and hips in contact with the exercise mat while aligning your head with your spine.
Step 2
Upward Phase: Exhale and stiffen your back by tightening your abdominal muscles. Keep your knee in contact with the mat and your head aligned with your spine as you lift your hips off the mat.
Step 3
Lowering Phase: Take a deep breath and gently return to your starting position.
Step 4
Exercise Variation: Increasing the length of time you spend in the elevated posture can help you increase the intensity of your workout.
10. Supine Reverse Crunches
Extreme crunch that focuses on the entire core area. If you’re experiencing back discomfort, please stop immediately.
Step 1
Starting Position: Lie prone on your back on a mat with your knees bent, feet flat on the floor, palms facing down, and your arms stretched out to each side. Exhale and tense your torso by contracting your abdominal/core muscles (“bracing”) as you raise your legs off the floor, bringing them directly above your hips while keeping a 90-degree bend in your knees. Hold it for a few moments and relax. Place your arms on your body for added balance.
Step 2
Upward Phase:
- Exhale and contract your abdominal, core, and hip flexor muscles as you raise your hips off the mat and roll your spine up as if to bring your knees toward your head (your hips and pelvis should turn towards your rib cage).
- Avoid any knee-bending change during the roll-up.
- Continue to curl up until your spine cannot roll any further by using your arms and hands to assist with balance while you maintain this position.
- Hold this position for a few seconds before releasing.
Step 3
Downward Phase: Inhale and lower your torso down towards the mat in a slow, controlled fashion, bringing your upper thighs backward until they are positioned exactly over your hips. Continue to roll out until your spine and pelvis (hips) come into contact with the mat, while your knees are positioned directly over your hips with a 90-degree bend in your lower leg.
When performing this movement, keep in mind that good form is essential to prevent unnecessary strain on your lower back. Return to your initial position when repeating the motions, keeping control of your leg movement, and ensuring that your knees don’t move beyond your hips. The movement’s emphasis should be on pulling your pelvis upwards towards your rib cage since the abdominals link the rib cage to the pelvis area.
11. Cobra
This is my “good morning, and it’s time to wake up” routine. It’s a fantastic method to get ready for a stressful day.
Step 1
Starting Position: With your hands jointly by your sides and positioned directly below your shoulders, lie prone on your stomach on an exercise floor or mat. Plantarflex the bottom of your feet. Extend your legs and pull your toes away from your body.
Step 2
Upward Phase: Maintain a flat back by pushing your hips into the floor or mat and pulling your chest away from the ground while keeping your hips still. This will stretch your chest and abdominal muscles while arching your lower back. Hold it for 15 to 30 seconds.
Step 3
Downward Phase: Lie back comfortably on the mat or floor, gently exhale, and lower your upper body.
Step 4
If you feel any pain in the lower back while performing this exercise, stop immediately and consult your doctor.
Individuals may often raise their hips off the mat or floor as they extend their arms, depending on the length of their arms. In this situation, keep the hips on the mat by restricting the extension in your arms.
12. Squat Jumps
Complete body movement can be boosted through heart rate training while also working on total body movement.
Step 1
Starting Position: Put your feet hip-width apart and hold them there, your arms at your sides, and pull down and back (depress and retract) the scapulae without arching your low back while “bracing” (activating your abdominal / core muscles) to stiffen your spine.
Step 2
Downward Phase:
Begin your downward phase by moving your hips back and then lowering yourself gradually to make a hinge-like movement at your knees.
Continue lowering yourself until you feel your heels about to lift off the ground.
Keep your head facing forward and bend at the hips to maintain a flat back, bend forward at the hips and keep your head facing backward, and position yourself so that you can support your arms in a most comfortable or balanced way.
Step 3
Jumping Movement: At the bottom of your downswing, force through your lower extremity in a brief pause to achieve triple extension (pushing and extending your ankles, knees, and hips at the same time). Maintain a level body as you jump into the air with your feet parallel to each other and parallel to the floor.
Step 4
Landing: The landing phase is when your body absorbs shock, and the majority of the weight from the jump lands on your legs. Avoiding excessive forward movement and correct position in your lower edge, which puts more strain on your knees, are the most essential elements.
Step 5
The mid-foot should be dropped softly and quietly, then rolled quickly to the heels. To absorb the damaging forces linked with jumping, drive your hips backward and drop them to the ground. To prevent potential knee injuries, you should avoid locking out your knees or quads on your landing.
Step 6
Place your body in the posture with your trunk inclined slightly forward, your head straight, and your back rigid or flat. To protect your spine, keep your abdominal and core muscles engaged.
Step 7
Exercise Variation: You may increase the intensity and complexity of your jumping and landing exercises as you improve your jumping and landing abilities by: (1) While lowering your body, drive your arms behind you (shown), (2) Your arms should move forward and upward during the jumping stage (shown), or (3) The one noticeable change is that during the jumping phase, you should drive your knees toward your chest.
Before jumping, it is usually advisable to master how to squat and land first. Begin with small jumps once you’ve mastered the hip-hinge mechanism, but concentrate on your landing technique. Once you’ve perfected your landing technique, you can move on to higher-intensity jumps.
13. Forward Lunge
If I had to pick one leg exercise for the rest of my life, a lunge would be my first choice.
Step 1
Starting Position: Stand with your legs together. Bend a little and “brace” (tighten your spine) to stiffen your spine by retracting and depressing your scapulae without arching your low back.
Step 2
Quietly raise one foot off the floor and stabilize your body on the stance (supporting) leg to advance. If you detect any sideways movement in your upper body, stop it immediately. Try not to shift (keeping) foot. Before moving forward, hold this position only for a few seconds. The raised (swing) leg should make contact with a heel strike first, then gradually transfer your body weight into the forward (leading) foot that is firmly planted on the floor. Try to stay upright and balanced as you approach the top of this leg. Avoid side-to-side bending or movement in your upper body, and keep the stance (supporting) foot still.
Step 3
Focus more on lowering your hips toward the floor rather than thrusting them forward as you lunge. This will help you limit the amount of forwarding movement of your shinbone (forward tibia translation) over your foot. If you’ve tried the previous steps but still can’t get a full stretch, continue lowering your body to a comfortable posture or until your front thigh is parallel with the floor and your shinbone is in a slight forward bend. Bend forward at your hips while lunging, keeping a flat back.
Step 4
Begin by pushing off with your front leg, using both your glutes and quads (thighs and butt muscles) to return to your original upright position.
Before attempting this forward lunge, we recommend that you practice single-leg stands on the ground. You may also try making a lunge with arm drivers and multi-directional glute activation lunges once you’ve mastered the forward lunge.
14. Forward Lunge with Arm Drivers
Begin with a basic lunge and then progress to this more challenging variation, which targets some core muscles.
Step 1
Starting Position: Straighten your legs and raise your arms in front of you to shoulder height, keeping your elbows fully extended. To “brace” (engage your abdominal/core muscles) and stiffen your spine, retract and depress your scapula without arching your lower back.
Step 2
Without changing your position, carefully raise one foot off the floor while maintaining your body on the stance (supporting) leg. Avoid sideways shifting or swinging in your upper body, and don’t change the stance (keeping) foot. Before moving forward, hold this posture for a moment. The trailing (back) leg should contact the ground first, then transfer your body weight into the leading (forward) foot, which should be solidly planted on the floor. Keep your core tight and avoid sideways tilting or swaying in your upper body as you begin this leg. Attempt not to shift your stance (supporting) foot while you’re loading up.
Step 3
When you go into a lunge, concentrate on lowering your hips to the floor rather than thrusting them forward. The amount of forwarding movement of your shinbone (forward tibial translation) over your foot can be reduced by properly performing this exercise. Reduce your body to a comfortable posture or until your front thigh is parallel with the floor and your shinbone is in a slightly forward bend. Bend your knees and lunge forward, at the same time, bending forward at your hips and pushing your extended arms toward the ground in front of you. This puts added strain on your gluteal muscle group.
Step 4
To return to the start, firmly push off with your front leg and work both your quadriceps and glutes (thighs and butt muscles).
Before you start training with arm drivers, it is recommended that you first learn how to make single-leg stands on the ground and forward lunges.
15. Glute Activation Lunges
The MAXIMUS is a Gluteus exercise that is often neglected.
Step 1
Starting Position: Stand with your legs together and your forearms and hands in front of you at shoulder height, with your elbows, fully stretched. Without arching your low back, depress and retract your scapulae (pull your shoulders down and back) while “bracing” (engaging your abdominal/core muscles) to stiffen your spine.
Step 2
To the 3 o’clock position, step out sideways with the right foot (both feet remain pointed forward) from the same starting position. Begin bending at the hips, pushing them back while shifting your weight over that same foot as soon as the foot is firmly placed on the floor. Shift your weight to the left until your tibia (shinbone) is vertical with the floor, and your knee is lined up directly over the second toe of that foot. Keep your right foot flat and your left leg near or fully extended. Both feet should keep their heels in contact with the ground at all times.
Step 3
When performing a lunge, alternate your arms and lean your body in the opposite direction. This adds more strain to your glute muscle group. Continue to push off with your front leg, using both quads and glutes (thighs and butt muscles) to return to your starting position.
Step 4
Move with one foot in front and across the body from the original position (both feet still point forward). Begin by bending at the hips, pushing your bottom backward while shifting your weight over that same foot as you lower your legs. Continue moving your weight until your tibia (shinbone) is perpendicular to the floor and your knee is appropriately over the second toe of that foot. The opposite leg should be flexed with the heel on the ground.
Step 5
To add more weight to your gluteal muscle group, alternate the direction in which you’re turning and swinging your body and arms while lunging. To return to your upright beginning position, push off with your front leg and engage both your quadriceps (thighs and butt muscles) and glutes (butt muscles).
The glutes, which protect your knee during walking, running, and jumping activities, are targeted in this series of multi-directional (multi-planar) lunges. This exercise is beneficial for many of us because we have weak glutes. It may be done as part of your pre-exercise warm-up. Because the three movements are not especially difficult, we recommend learning this exercise first without your arms and then working your way up to the arm drivers as you feel more comfortable. Before attempting these glute activation lunges, it is advised that you first learn how to do single-leg stands on the ground and forward lunges.
16. Glute Bridge
“]Real people do yoga, and this is a great starting position for learning about the power of slow and controlled movements.
Step 1
Starting Position:
Lie prone on your back on an exercise mat in a bent-knee position with your feet flat on the floor.
Balance yourself by sitting on your heels with the toes facing away from you.
Gently squeeze your abdominal muscles to flatten your lower back into the floor.
Try to keep this mild muscular contraction going throughout the exercise.
Step 2
Upward Phase: While breathing, slowly tighten your abdominal muscles and straighten your hips by contracting your glutes. For further stability, press your heels into the floor. Pushing your hips too high might lead to more hyperextension (arching) in your low back, so avoid doing it. Excessive arching in your low back can be prevented by maintaining your abdominal contraction.
Step 3
Lowering Phase: Inhale and slowly come back to your starting position.
Step 4
Progression: Continue by gradually extending one leg in the elevated position and starting with both feet together.
If you want to push your hips as high as possible, avoid arching your lower back as you press your hips upward. Contracting your abdominal muscles before and throughout the lift can help you maintain good form.
17. Hip Rotations (Push-up Position)
I’ve always had difficulty finding a good hip exercise, so do this before any push-up activities to help you stabilize your body.
Step 1
This is a dynamic movement exercise used to prepare the body for activity. The push-up with a twist is tough to master because it requires modifying a typical push-up posture. Before attempting this exercise, you must perfect your push-up technique.
Step 2
Starting Position:
- Bring your feet together behind you and lower yourself to an exercise mat.
- Bend forward slowly, keeping your palms flat on the mat and your hands shoulder-width apart with your fingers pointing toward you or slightly inward.
- Slowly transfer your weight forward until your shoulders are in line with your hands.
- Reposition your hands as needed to allow full-body extension without bending at the hips or knees.
- Contract your abdominal/core muscles (“brace”) and glutes and quadriceps (butt and thigh muscles), as well as align your head with your spine to stiffen your torso.
- Put your feet together and dorsiflex your ankles (toes pointed toward your shins).
Step 3
Rotational Movement: Exhale and slowly raise one knee towards your chest, bending the knee and flexing at the hip. Do not allow your hips and lower back to dip towards the floor or rise upwards.
Step 4
- To move your bent leg across the front of your torso:
- Bend at the knees while rotating your hips.
- Avoid moving or lowering your hips in this knee-tuck posture.
- Continue to move until your hips are unable to turn any further.
- Throughout the exercise, maintain a level head and shoulder.
- Take a quick break.
Step 5
Rotate the other way (towards your legs) until your hips can no longer rotate any further without causing spine movement. Throughout the exercise, maintain a level head and shoulder.
18. Side Lunge
“]It is advanced in the amount of movement necessary to make a static posture dynamic.
Step 1
Starting Position:
- Stand with your feet more than hip apart and parallel to each other.
- Maintain your balance during the exercise by putting your hands where you are most comfortable.
- Contract your core and abdominal muscles (or “brace”) to stiffen your torso.
- Keep your head slightly elevated and shift your body weight onto your heels.
Step 2
Inhale, then discharge your right leg gently, taking a few steps to the right while keeping your body weight over your heels and both feet pointed forward. After that, bend your hips and push them backward while also shifting your weight to the right foot. Keeping the back leg straight, move your weight to it and over the right foot until your shinbone is vertical to the floor, with your right knee aligned directly over the second toe of your right foot. Your bodyweight should still be distributed into the right hip, and your left leg should be near or full extension at the knee. The heels of both feet should remain flat on the floor. Place your left foot flat on the floor as you shift your weight to your right hip and alternate. Keep your legs straight and elevate them off the floor if you need to reach for something. Reaching your right foot with your left hand will emphasize hip flexion (alternate with the right hand reaching for the left foot).
Step 3
Exhale, push off firmly with your right leg, and return to your starting position. Repeat the exercise on the other side.
When performing a side lunge, many people step too far outside the leg and cannot align the shinbone (tibia) over the foot. The knee falls within the foot as a result of this error. All you have to do is reduce the width of the step taken to position the tibia over the placed foot.
19. Side-Lying Hip Abduction
A frequent error is to raise the leg too high in this exercise. It’s a tiny yet powerful movement.
Step 1
Starting Position:
- Lie down with your legs stretched out away from your body on a mat/floor.
- Place your feet together with your lower arm bent and placed underneath your head for support while the top armrests on top of your upper hip.
- Align your shoulders and hips vertically to the floor. Your spine and head should be in alignment.
Step 2
Upward Phase: Exhale and carefully lift the upper leg off the lower leg, keeping the knee extended and the foot neutral. The raised leg’s knee should point straight away from you, and the hips should remain vertical to the floor (not turn upward towards the ceiling or downward toward the floor). Raise the leg until your hips begin to bend upward or until you feel the tension in your low back or oblique muscles.
Step 3
Downward Phase: Inhale gently and return your lifted leg to its starting position in a steady manner. Roll over and repeat with the other when you’re done with one leg.
Raising the leg too high is a typical mistake in this exercise. The thigh may only abduct (move out sideways) to 45 degrees due to the design of the hip joint. If you go any further than this position, the hip must be moved as a whole and no longer targets muscles intended for this exercise.
20. Side-Lying Hip Adduction
It is an even more minor movement than Abduction but equally important.
Step 1
Starting Position: Lie down on your side on a mat/floor with your legs extended and feet parallel, facing away from your body (at 90 degrees to your shinbone). While your thighs support the elbows, keep your lower arm bent and positioned under your head for support. Your shoulders and hips should be level with one another. Your head and spine should be in line. Bend your foot and gently pull it forward, placing the lower leg in front of the upper leg. Keep both legs straight and extended with your feet in a neutral position on the floor.
Step 2
Upward Phase: Raise the lower leg off the floor by exhaling and steadily extending the knee while keeping the leg in a neutral position. The hips should remain vertical to the floor, with the knee of the raised leg remaining in line with the hip (the knee of the lifted leg should not turn upward or downward). Continue to raise the leg until your hips start to bend sideways or until you feel strain in your low back or oblique muscles.
Step 3
Downward Phase: Gently breathe into your raised limb and gradually lower it back to its starting position in a measured manner. After you’ve completed your set, roll onto your other side and repeat.
It is unnecessary to lift the leg considerably off the floor/mat in this direction since there is little hip movement.
21. Side Plank (Modified)
A comprehensive core workout that incorporates a variety of exercises. Stop if you suffer from joint pain.
Step 1
Starting Position:
- Sit upright on an exercise mat and place your left leg down next to the right.
- Bend your right leg at 90 degrees of flexion and keep your left leg extended, making contact with the mat on the inside surface of your left foot.
- Raise your upper body with your right arm and bend your elbow to 90 degrees, resting it directly under your shoulder.
- Keep your right knee and hips in contact with the exercise mat as you align your head with your spine.
Step 2
Upward Phase: Exhale and stiffen your back by flexing your abdominal/core muscles. Raise your hips and right leg off the mat by tightening your spine and abdomen/core muscles. Your right elbow should be under your shoulder, with your head aligned with your spine.
Step 3
Lowering Phase: Inhale and return yourself to your starting position in a slow, controlled manner. Repeat on the other side.
Step 4
Exercise Variation: Increase the intensity of the workout by extending the time you spend in the elevated posture.
If you place excessive pressure on the inside of your upper foot or upper knee, this exercise may result in harmful strains on those joints and should be stopped.
22. Side Plank with Straight Leg
Don’t forget to take a breath during this activity and exhale when you’re working hard.
Step 1
Starting Position: Lie down on an exercise mat with extended legs, placing your left leg over your right leg and stacking your feet one on top of the other. Place your right elbow below your shoulder, align your head with your spine, and keep both hips and the right knee in touch with the exercise mat.
Step 2
Upward Phase: Exhale, tighten your abdominal / core muscles to stiffen your spine, and lift your hips and knees off the floor while maintaining contact with the side of your right foot and keeping your head parallel with your spine. Maintain your right elbow positioned directly under your shoulder.
Step 3
Lowering Phase: Inhale and slowly return to your starting position. Change the sides and repeat.
Step 4
Exercise Variation: This workout can be done to a higher degree of intensity by (1) Increasing the time you spend in the elevated posture, (2) we must first raise the upper leg above the lower one, or (3) Raise the lower leg from the floor, keeping touch with your elbow and the top of your upper leg’s foot.
When lifting it off the lower leg, there’s no need to raise the upper leg higher than parallel with the floor.
23. Single-Leg Stand
This one I do while brushing my teeth in the morning – some people think it’s mad, but I call it multi-tasking.
Step 1
Starting Position: You’ll be ready to apply your body weight by standing with your feet approximately shoulder-width apart or a few inches apart (2-3″). However, keep them parallel to one another. To avoid excessive arching in your lower back, retract and depress your scapulae (pull your shoulders down and back) while contracting your abdominal muscles simultaneously. Keep your abductors and adductors under strain while bending your knees slightly (contract your inner and outer thigh muscles). The single-leg stand will minimize excessive hip abduction (sideways shift).
Step 2
Movement:
- Raise one leg 3-6 inches off the floor, keeping your body upright on the supporting (supporting) leg.
- Keep your upper body straight and avoid any sideways movement or swaying. The stance (supporting) foot should not be moved.
- Hold for 10-15 seconds before returning the lifted foot to the floor.
- With each foot, complete the same number of repetitions.
Step 3
Exercise Variation: Increase the intensity of this workout by progressing through the exercises listed below (1) Raise the one leg higher off the floor (shown) to elevate your center of mass even more, (2) lift both arms overhead, (3) raise one arm to your side, (4) bend your head, (5) then finally close your eyes (6) close your eyes and bend your head.
Try to master the movement in front of a mirror so you can observe and modify the amount of hip adduction (sideways shift) over the stance (supporting) leg. Reduce the amount of hip abduction as much as possible to avoid putting excessive stress on your knee joint. The essential thing to know is that you should balance on the stance leg (the foot on the ground). Consider pushing your foot into the floor and squeezing your glutes (butt muscles) to help reduce any sideways bending.
The majority of us can lift one leg, but the quality of movement is crucial. Exercises should be performed slowly and carefully to minimize the risk of a rapid change in posture. Continue to repeat each sequence until you can perform them with reasonable control and form.
24. Standing Calf Raises – Wall
This type of workout is terrific for my shins since they are one of my weakest spots.
Step 1
Starting Position: Stand 6 -12″ from a wall and face forward with your feet hip-width apart. Level with your chest or shoulders and extend your arms to place your palms on the wall.
Step 2
Upward Phase: Exhale as you raise your toes off the floor and maintain your knees straight and without rotating your feet. To keep your body balanced, use your hands to support it on the wall. Hold your raised posture for a few seconds.
Step 3
Downward Phase: Inhale and carefully lower your heels to the floor.
Step 4
Exercise Variation (1): Single-leg Calf Raise: Single-leg calf raises require you to stand up straight, with your left foot and left knee bent raised off the floor. Repeat the entire sequence on your right leg. 2. Internal and External Foot Position: Turn your feet in (to the 10 and 2 o’clock positions on a clock) or out (to the same clock positions) as a starting position for calf raises, and perform them with both legs or with a single leg. When you turn your feet inward, the medial (inner) muscles are emphasized, whereas the lateral (outer) muscles are emphasized when you turn your feet outward.
Step 5
Exercise Variation (2): Modified Internal and External Foot Position: Turn your feet inward (to 10 and 2 o’clock) or outward (to the same clock positions) for performing calf raises with both legs or a single leg. When you turn your feet inward, the medial (inner) muscles are emphasized, whereas the lateral (outer) muscles are emphasized when you turn your feet outward.
The gastrocnemius (large calf muscle), which has a higher percentage of fast-twitch fibers, is more suited to more powerful exercise. As a result, once you’ve mastered your technique, these increases may be done more rapidly (with greater power and force) to give you even better results from the workout.
25. Supine Pelvic Tilts
These are not considered abdominal workouts, but you will feel the burn after a set of them.
Step 1
Starting Position: While on your back position, align your knees with the second toe of each foot and bring both feet flat on the mat/floor. Raise your arms to the side and abduct them (extend to the side) with the palms supinated (facing up to the ceiling).
Step 2
Downward Phase: Exhale, gently squeeze your abdominal muscles to flatten your low back into the mat/floor. Avoid attempting to lift your tailbone off the mat/floor. Hold this posture for a few seconds.
Step 3
Upward Phase: To increase the arch in your low back, inhale and gradually relax your abdominal muscles while gently contracting your erector spine (low back muscles). Avoid lifting your hips off the mat/floor. Maintain this posture for a few seconds before returning to your original position.
You May Also Like

Best Door Gym
January 11, 2025

The Best 16 Weight Benches For Your Home Gym in 2024
August 2, 2024


Blog Comments
Best Exercises For Lose Belly Fat At Home - Home Workout Reviews
February 17, 2022 at 9:21 am
[…] on home workout reviews are based on verified data from peer-reviewed and academic research papers, prominent businesses, […]